Electronics Course 4 - Introducing Transistors
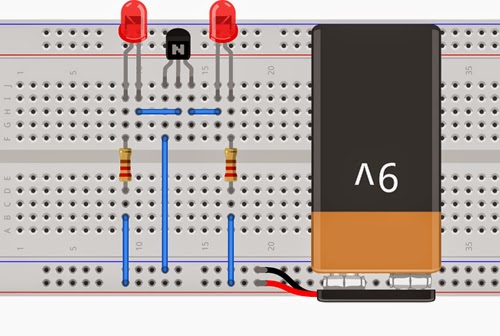
To make this experiment you will need
- 1x NPN transistor
- 2x LED's
- 1x 10K resistor
- 1x 470 resistor
- A 9v battery
- A battery clip
- A breadboard
- Some wire
There are several types of transistor available, at this stage, we are going to consider just the easiest, and cheapest type, the NPN transistor
This is the symbol for your circuit diagrams
There are 3 legs on a transistor- Collector
- Emitter
- Base
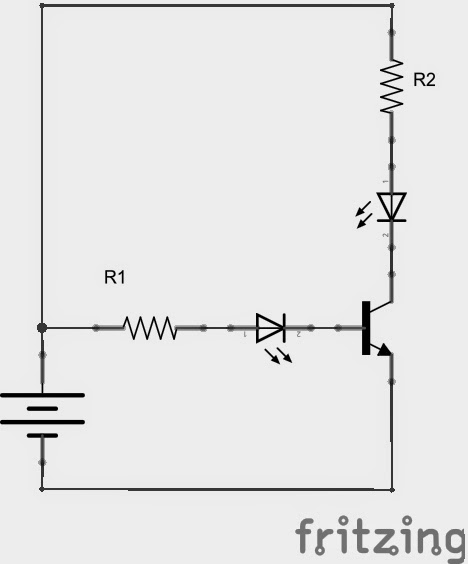
this is the circuit diagram
Now follow each line of the diagram, and see how it relates to the circuit build.
R2 should be a 470 ohm resistor, the same as we used in the last circuit. R1 we will use a 10,000 ohm resistor.
The LED attached to the base of the transistor will be really dim, its only getting a very small amount of current (because of the 10K resistor - GREEN line below). This "opens" the transistor to allow enough current to flow through the other LED to let it be full brightness (because of the 22R resistor - BLUE line below)
Inside there are 3 layers of silicon, these have been chemically altered to give them particular properties. We will cover this in a later course, for now it is enough to know that current can pass from the collector to the emitter only if there is some current at the base, the base acts like a gatekeeper.
- No current to base - No flow from Collector to Emitter
- Small current to base - Large current from Collector to Emitter
Transistors can act like a switch! if we add enough current to the base, the maximum allowed current will flow through the transistor! (this is called saturation, if you are interested, google saturation current)
Interestingly, if we don't saturate the transistor, varying the base current will vary the Collector-Emitter current. In this way it can act to "Amplify" the input current.


No comments:
Post a Comment